

Mosaic Release 2.0.2 - Release Notes
Version 2.0.2 of the Oxford Mosaic platform was released on 25 April 2017.
New features
- The ability to add custom sub-content types (Site Settings > Content types)
- The ability to create custom redirects (Site Settings > URLs and redirects > Redirects)
- A single column page layout
- The ability to add column layouts within the WYSIWYG editor
- A description field in the “Setup” section of items used to populate the description metatag
- Footer area can now include all widget types and is not restricted to WYSIWYG widget
- Extended standard colours and fonts selections and added new "Advanced" modes allowing a larger amount of control over your site's look and feel.
Bug fixes
- Fixed 404 File not found errors when editing nested widgets in quickedit mode
- Stopped error messages arising from pages/referring pages with long urls
- Corrected pagination of the Site Settings > Users list when there are more than 25 users
- Improved styling of Symplectic popups
- Improved styling of slideshows on mobiles
- Stopped cache purge queue slowing down
- Removed redundant column from Manage Files page
- Removed link to sitelinks page from the footer of sites that aren't being indexed
- Security enhancements to two areas
Further information
Custom content types
Previously, we provided some out-of-the-box content types which you could choose to enable or disable for your site. We have now provided an interface allowing you to create custom types for your site based on Page, Article, Event and Person.
Any of the types we had previously provided and were in use on your site will be transferred across and enabled automatically.
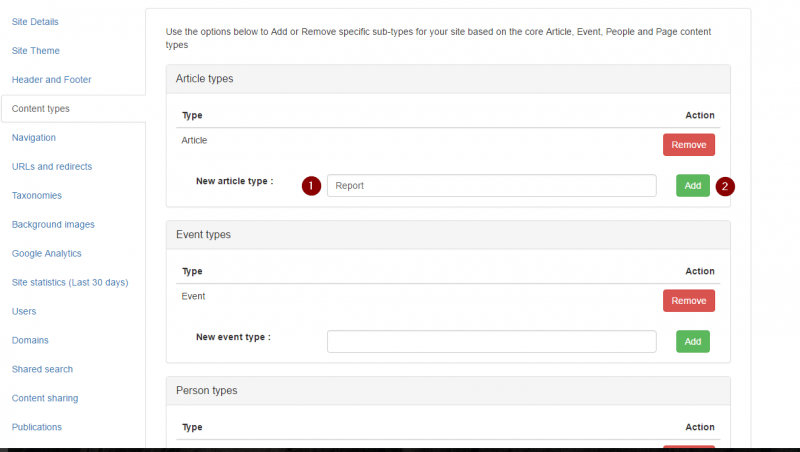
To add a new content type to your site, visit "Site Settings > Content Types"
You will now see all of the current content types grouped with their base type (Article, Event, Person, Page).
- Enter the name of the new type you want to create in the relevant base type section - in the example below a new Article type called "Report" is being created
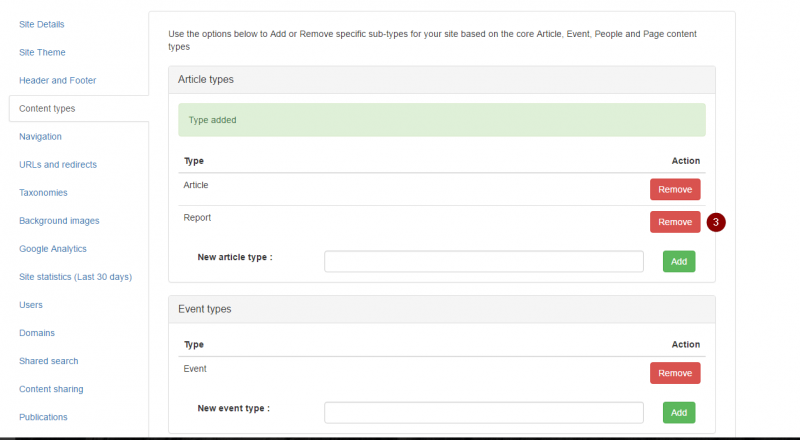
- Click the "Add" button to create this type. You should now see this type appear in the appropriate section
- If you want to delete a content type, simply click on the "Remove" button next to it. Please note that in order to remove a content type from your site, you cannot have any content of that type currently in use.
Custom Redirects
Oxford Mosaic now provides a way for you to forward people to an external site when accessing a particular path or area of your site. You can access the area to set up redirects via "Site Settings > URLs and redirects".
See the guidance page on URL Redirects for more information.
WYSIWYG Column Layouts
You can now insert columns into a WYSIWYG area to assist in laying-out your content within these areas.
- To insert a column layout click on the "Layouts" button on the WYSIWYG toolbar

- A window showing the available column layout options will now be displayed. To select a layout simply Click on it.
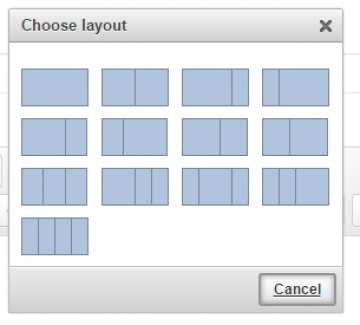
- The layout will now be inserted at the position the cursor was at within the WYSIWYG (or as the first item if nothing had been created yet).

- When hovering over the layout area you will see some tabs at the top (1) allowing you to remove the layout or edit it (2). The yellow areas are where you can place your cursor to start adding content.
- You can stack multiple layouts in one WYSIWYG area and each layout can have a different number or formatting of available columns.
Colours and font selections
Colour and font management in the Oxford Mosaic platform has been greatly enhanced. Existing colour or font selections have been ported over to the new system and you now have the ability to control them further.
Colours
Previously, colour settings were editable under Site Settings > Site Theme in the "Colour scheme" section. This has now been moved to its own page accessible from the same area by clicking on the "Colour management" button.
In standard mode, you still have the option of selecting one of the Mosaic pre-built themes for your site or alternatively selecting a "Custom colour scheme" (previously known as "Pick 'N' Mix"). The custom colour scheme options have been expanded from 4 colour groupings up to 10.
If you need even more granular control, you can now switch into "Advanced" mode by clicking on the toggle in the top right of the page.

In Advanced mode you will see 5 sections of colour groupings categorising the available colour choices. The "Widgets" section is further broken down into sections for each widget type available on the platform. So, if you want your Tabs to be a different colour to your Accordions, you can make that happen!
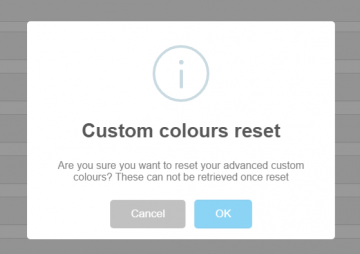
If you get into difficulty editing the colours of your site you also have the option to revert back to one of the Mosaic-supplied schemes by using the "Reset custom colours to base theme" control.
- Select a pre-set theme whose colours you want to reset to and click on the "Reset custom colours" button.

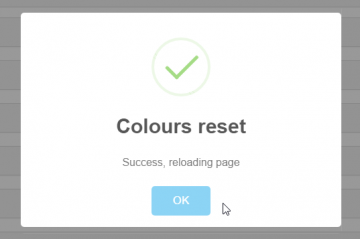
- A notification will warn you that you are about to over-write your custom colours and these will then be lost. Click "OK" if you are happy for this to proceed.
- You should now see a message confirming the reset, informing you that the page will be reloaded with the reset colours.
Fonts
Font management has the same setup as colour management with a few additional things. It is now possible to set font choices for many different parts of your site, picking from a selection of 28 fonts.
Go to Site Settings > Site Theme and click the "Font management" button to access the Font management page. At the top left of the page you can click the "Font gallery" button which opens a window showing a preview of all of the available fonts.
Under the "Custom font scheme" setup you have the option of selecting which fonts to use, whether you want these to be the same size as the current Mosaic defaults or bigger, and whether they should be bold or not. Note that not all size and weight options are available for all of the font choices, so if a font does not provide a bold version then this selection will be disabled.
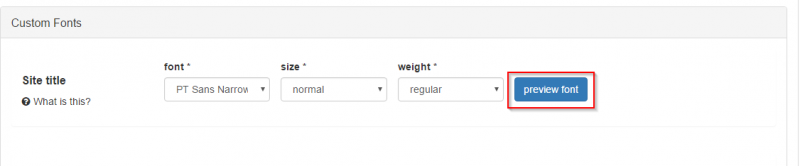
The preview font button next to each section lets you see the font you have selected for that area with the chosen weight.
In advanced font management you get additional control over the exact size of fonts using rem units, a wider selection of weights, and the ability to make the font italic (if supported by the current font selection). The preview button also shows you what the font looks like based on your current selections.