Files

User level: Site Owner; Site Administrator; Site Editor; Site Author; Site Contributor


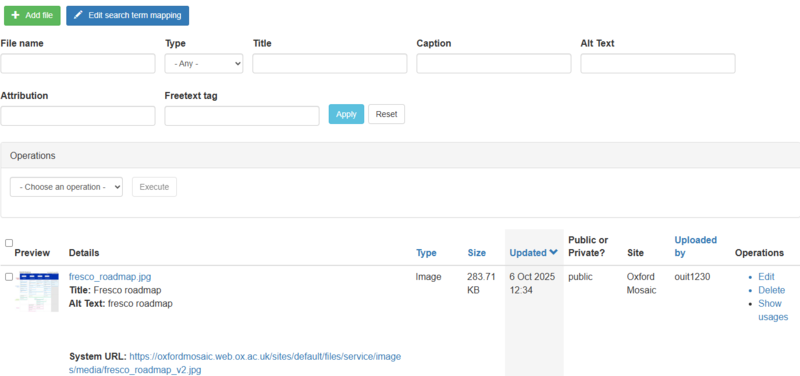
The 'Files' tab under 'Manage Content' allows you to upload and manage your media content (e.g. images and documents).  

There is a filter function that allows you to search the files list by name, type and file details.

Site Administrators and Site Editors will also see the Operations dropdown that allows them to archive or delete files in bulk. 

files screen

Expand All

To upload a file to your site:

  • Go to Manage Content > Files
  • Click 'Add file(s)'
  • On the file upload screen, drag the file(s) you want to upload into the upload field (1) and click 'Next' (2)
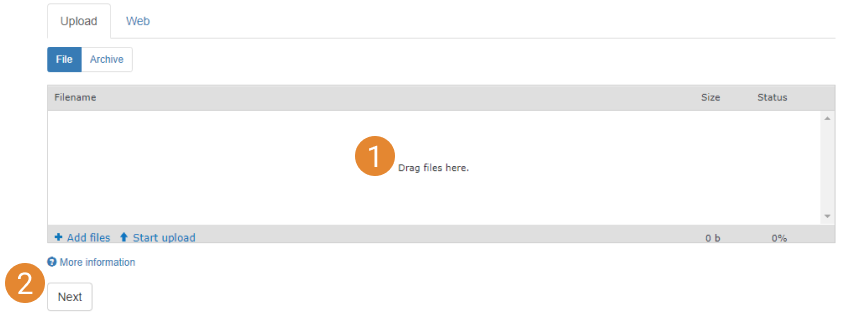
    file upload field
  • The platform's anti-virus check will scan each file. Once all files are scanned, they will be added to the site's media library
  • The Manage Content > Files screen will be reloaded, and the new files will be visible at the top of the files list

Media upload size limits

Different upload limits apply depending on user role. For details of the user roles' media upload limits, see the Users documentation.

Accepted file extensions

A range of extensions can be uploaded to Mosaic. Some file types can be rendered using relevant display methods, e.g. jpg files can be rendered as images; an audio player can be displayed for mp3 files; a video player can be displayed for mpeg files. Other file types can only be displayed by embedding a link to the file in a WYSIWYG widget. See the table below for details of these two groups of file types.

Display method available Embedded as a link only
jpg

txt

jpeg

doc

gif

docx

png

xls

svg xlsx

mp3

pdf

mov

ppt

mp4

pptx

m4a

pps

m4v

ppsx

mpeg

odt

avi

ods

ogg

odp

oga xml
ogv zip
wav enz
weba eps
webp tif
webm tiff
  hol
  ics


  1. Go to Manage Content > Files and find the file you want to edit.
  2. Click 'Edit' next to the file's entry.
  3. On the Edit screen, click 'Choose file' under the Replace file options 
  4. Select the file you want to use from your PC and click 'Open' 
  5. A blue 'Replace' button will appear in the Replace file options -- click this 
  6. When the Edit screen reloads, the file will be replaced with the newly selected one 
  1. Go to Manage Content > Files and find the file you want to delete.
  2. Click 'Delete' next to the file's entry.
  3. You will be taken to a page where you can choose to 'Check where this file is used'.
    • If the file is in use, you will see a table listing all of the places where the file is used. Note that the file may be used in listing images or in previous page revisions. 
  4. Click 'Delete' again to proceed.

Only Site Editors and Site Administrators have the permission to delete files that are currently in use or uploaded by other users.

Bulk deletion of files

To delete multiple files at once without checking usage for each:

1. Go to Manage Content > Files and use the tick boxes to select the files you want to delete.
2. In the Operations box at the top of the list, select 'Delete' from the dropdown.
3. Click on 'Execute' to delete the selected files.

Only Site Editors and Site Administrators have the permission to bulk delete files.